Three ways to create a seamless scallop pattern in Procreate
- jasminehnatkova
- May 15
- 6 min read
Three creative scallop patterns to add to your pattern repertoire!

Creating a seamless pattern with a scallop motif is a fun way to add structure and elegance to your designs. Scallop prints are incredibly versatile and surprisingly easy to create in Procreate!
In this tutorial, I’m going to show you 3 different ways to build a seamless scallop pattern, each with its own unique style and technique.
We’ll start with simple dots and dashes to create decorative scallop markings, then use Procreate’s symmetry tool to design a floral scallop motif, and finally explore tessellation to create a striking art deco-inspired pattern.


By the end of this post, you’ll have three new approaches to try in your own surface pattern designs.
If you’d prefer to watch this tutorial you can view it below. If not, keep scrolling for a step by step written approach!
Download and import the Scallop Template
To start with you will need to download the scallop template if you haven't already got one. This is one of three layout templates in this free pack. Click on the image below to download your templates now.

Once you have downloaded the scallop template and saved it to your camera roll, open a new document in Procreate. The settings I suggest you use are 12 x12 inches at 300 DPI.
Now go to import photo and select the scallop template.
If the template doesn’t go to the edges of the canvas it’s extremely important that you tap ‘fit to canvas’ so it goes right to the edges (otherwise it won’t work!)
Pattern 1: Etched Scallop Pattern


The Etched Scallop style is inspired by primitive markings and hand-drawn etchings often seen in ancient art and folk design.
This technique creates a beautifully imperfect scallop motif with plenty of character and movement.
It’s a great way to add a more organic, handcrafted feel to your seamless patterns and you can get creative with the type of marks you make and the brushes you use.
These patterns can be great as blender prints in a pattern collection.
Create a new layer on top of your template and turn on vertical symmetry. You do this by going up the spanner icon, toggle drawing guide on and tap edit drawing guide. Select symmetry from the banner along the bottom and then under options, choose vertical symmetry. This means that what you draw on one half of the canvas will be mirrored on the other half and save you lots of time!
Start by creating some simple marks by following the top curve of the scallop, ensuring you don't touch the edge of the canvas.
Keep adding to your pattern, using different marks and colours. Don't feel it needs to be 'perfect'. Imperfections add to the character!


When you've finished, make sure all your marks are one one layer (apart from the background colour if you've used one) and draw some temporary marks in the corners as you can see below. This will ensure the whole canvas is selected when you make the repeat.

Go to the layers panel and duplicate the layer four times so you have five identical layers.

Select the top layer, and with snapping and magnetics on move it up into one of the corners so only a quarter of the layer is now showing. You should see orange markers appear when it is in the right place. Do the same with the next three layers down. The original layer should still be in place in the middle.

Merge the top four layers together and rub out the temporary markings which will be in the midde. Then rub out the markings from the original layer which will be at the corners. You can now merge the two layers together and delete the template layer underneath.
You've finished! You can also scale the pattern down to see how it looks on a smaller scale.

Pattern 2: Symmetrical Floral


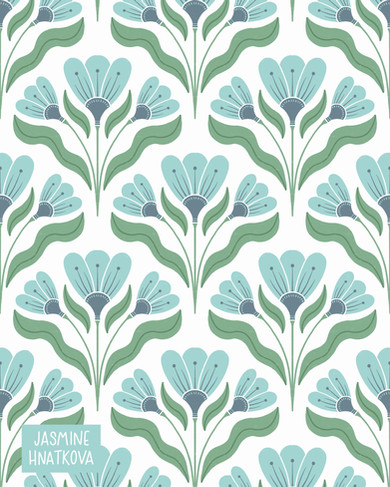
This Symmetrical Floral Scallop style uses Procreate’s symmetry tool to create a balanced floral design which can work beautifully for wallpaper and fabric.
You can create your design with as much or as little detail as you like and really bring your own style into it.
Create a new layer on top of your template and turn on vertical symmetry. (If you need help with this see step 1 in the previous pattern.)
Create a floral motif within the bounds of the scallop template. You could include one or multiple flowers, leaves and any other motifs that fill in the gaps. Try to keep your motifs a roughly equal distance from the edge of the template all the way round. This will preserve the scallop shape.

Make sure your pattern is all on one layer and make some temporary markers in the corners of the canvas.
Duplicate the layer four more times and move each layer up to a corner (making sure snapping and meagnetics are both on!) The original layer should stay in the centre.


Marge the top four layers together and rub out the temporary markers which will be in the middle. Then rub out the temporary markers on the original layer which will be in the corners. Delete the template layer and you're done!

Pattern 3: Art Deco Scallop


In this third design, we will take inspiration from the bold geometry of classic art deco design.
By tessellating the scallop motif, you can create a seamless repeat with a structured, interlocking layout that creates a little twist on the standard scallop structure.
For this design we need to change the template a little bit before we start.
Once you have imported your template and ensured it fits right to the edges of the canvas, select it, and turn snapping and magnetics on. Scale down the template to half its size and reposition it so touches the top but is in the middle horizontally.


Now duplicate it, and in the bottom bar select flip vertical. Move it so it is directly underneath the first template.

Now dulicate that one and on the bottom bar tap rotate 45 degrees twice and move it against the side edge so it tesselates.

Then duplicate that one and tap flip horizontal and move it to the other side. When you have finished, your template should look exactly like the image below. With snapping and magnetics on the whole time it should all snap into place nicely. You can merge the four template layers together into one layer.

Add a new layer above the template and turn on quadrant symmetry. (Spanner, canvas, Drawing guide on, edit drawing guide, symmetry, options, quadrant symmetry)
Start with the top section, and draw any shapes within the top scallop. I've decided to stick to a monochrome geometric, but you can experiment with anything you like! As quadrant symmetry is on, your drawing should also show up in the bottom scallop.

When you're happy, you can now draw in one of the scallops on the side. You can draw something similar, just by adding shapes, or you can fill the whole section with colour and then draw the shapes with the eraser as I have done. To replicate what I have done, first carefully trace round one of the side scallops and fill with colour.

Then, using the eraser tool, draw your shapes inside the coloured section. You can replicate the shapes you drew before, or draw something totally different!

When you're happy with it, it's time to make the repeat, and this works in exactly the same way as in the previous patterns in this tutorial. Draw some temporary marks in the corners and duplicate four more times so you have five identical layers. With snapping and magnetics on, move each one to a corner, leaving the original layer in the centre. Finally, rub out the temporary markers!

This is a totally optional step, but I always love adding some texture to my finished patterns, particulalry a monochrome pattern such as this one. I think it elevates it and adds some depth and interest!
You can see below I have added in some seamless texture overlays, both to the background and to the foreground of this pattern. These texture overlays are both from my seamless texture overlas pack, so can just be popped on at the end, they are already in repeat! The textures I have used here are the 'scratchy light' and the 'block print' textures.

You can find out more about these overlays and how you can use them to elevate your own patterns by clicking the link below:

Let me know how you get on!
I'd love to know if this has sparked some inspiration for you, or if you're going to have a go at one or all of these patterns. Let me know in the comments, and feel free to ask any questions if you get stuck or need clarification on anything I've mentioned!