Novelty checks in Procreate: The simple pattern you may have overlooked
An easy pattern idea for your Procreate toolkit
If you’re looking for an easy pattern idea to try in Procreate, a novelty check is a great place to start, especially if you are designing a pattern for a specific occasion such as Autumn or Christmas.

Checks are one of those patterns that are incredibly simple to make, but can be surprisingly effective and look really sophisticated! And you can fit them around any theme you'd like.
If you're a visual learner and would prefer to watch this tutorial you can click play below, otherwise scroll on to keep reading!
Why design a novelty check pattern?
They’re very easy to make!
Perhaps the biggest advantage of a novelty check is that it’s so simple to create. You don’t even need to know how to make a traditional repeating pattern to get started.
The basic structure is simply a grid of squares, with each square containing a motif or illustration. Once you’ve created your grid, you can concentrate on the fun part: choosing and arranging your motifs.
This makes novelty checks a great pattern to try if you’re new to surface pattern design or if you want to create something quickly.
They’re perfect for creating 'themed' designs
Novelty checks lend themselves really well to specific themes because you have so many individual spaces to fill with motifs.
For example, if you were creating a Christmas design, you could fill your checks with trees, presents, candy canes, stars and baubles. For a gardening theme, you could use flowers, gardening tools, seed packets and wellies.
This can also make them particularly useful from an SEO perspective when you’re uploading your work to print-on-demand sites such as Spoonflower. A very specific collection of motifs can give you lots of relevant keywords to work with, helping your design target a particular search term or audience.

They’re great when you’re stuck for a Spoonflower Design Challenge idea
If you take part in Spoonflower’s Design Challenges, you’ll know that sometimes the hardest part is simply coming up with an idea!
A novelty check can be a really useful format to fall back on when you’re struggling for inspiration. Once you know the challenge theme, you can brainstorm a collection of motifs that relate to it and use those to build your check.
The format gives you a starting point, while still leaving plenty of room for your own interpretation of the theme. You can see below two checked patterns I have entered for design challenges in the past.
'Skies Above Bedding' August 2023, and 'Winter Holiday Patchwork ' July 2024
They can be turned into cheater quilts
Novelty checks can also work particularly well as a faux or ‘cheater’ quilt design.
The individual squares can look like fabric quilt blocks, giving you the appearance of a patchwork quilt without actually having to create a traditional quilt pattern.
This makes the design particularly appealing for customers on print on demand sites such as Spoonflower who are looking for this kind of design. Just make sure you add the tag 'cheater quilt' so people can find it!

How to make a novelty check
Firstly, start a new canvas in Procreate at 12x12 inches and 300 DPI.
Now go up to the spanner icon at the top left and toggle drawing guide on. Tap edit drawing guide and change the grid size to 3 inch squares.

You can see from the image above that it will create a 4 by 4 grid in your canvas. This is going to be our template for creating our checks.
Now fill the whole canvas with your first colour. Then on a new layer add your second check colour. I am sticking to neutral colours for this example.

Now select the top layer colour (for me it is the slightly darker one) and turn snapping and magnetics on in the bottom toolbar. Make sure they are both toggled to max.

Scale down the colour so it is half as big. It should snap into place and orange lines should appear to tell you it's exactly in the right place.

Now duplicate this layer and move the square to the diagonal corner, again making sure it snaps into place.

Now you can merge the two darker colour layers together and scale down the whole thing so it is in the top left corner.
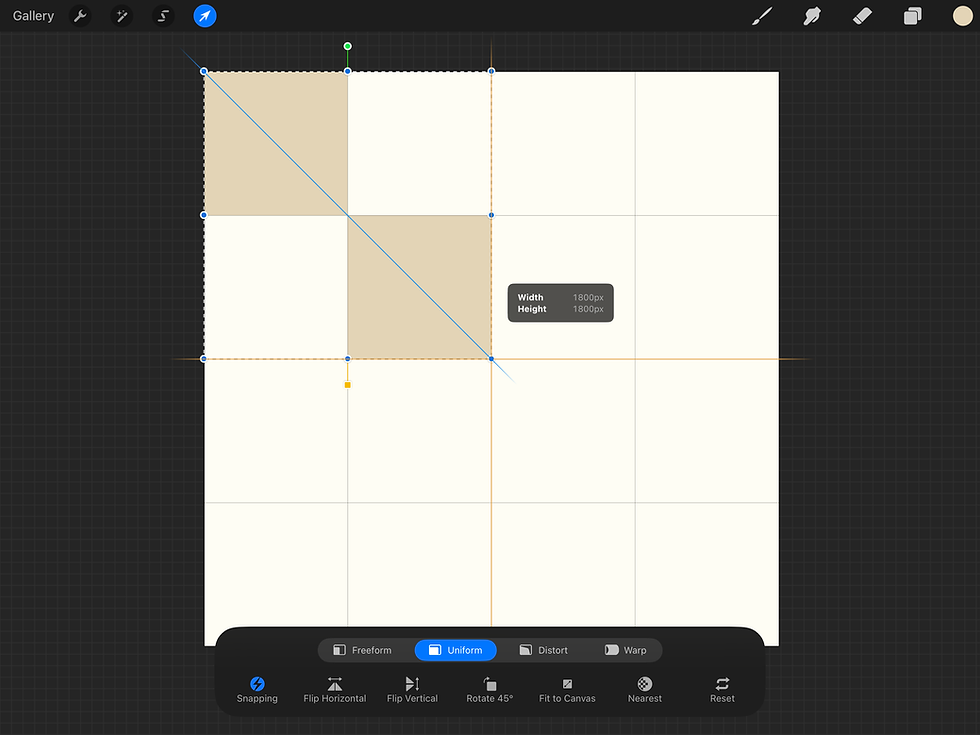
Now duplicate this layer 3 more times and move them to each of the other corners.

You can finish by merging the darker checked layers together so the same colours are all on the same layers. You can see that your original colour is still on its own layer below.

This is now your basic template for your novelty check. (If you wanted this could just stop here as a basic check! It could be uploaded to Spoonflower or it would work as a blender print for a pattern collection.
Once you've completed your check grid, you've got to the fun part - filling in the squares!
You can really have some fun here and bring out your own unique style. But here are some basic guidelines to help you out:
Think about a theme before you start and make a list of all relevant motifs you could include. There are 16 squares to fill so that's quite a few illustrations you'll need. (Although you can double up if you need to!)
With a pencil and on a new layer, sketch out your motifs first so you can see how they will fit together on your canvas. You can see below my first sketch for this Christmas check. You'll notice that I actually ended up changing a lot of these later on, but it really helps to have a starting point.

Keep each motif within one square and don't let the motifs touch the sides. As with any repeat you are making you don't want to draw right up to the edge of the canvas or it will be cut off when it is put in a repeating block.
When you are ready to ink your design, I would suggest (as always!) sticking to a limited palette. That means not adding more than 4-5 colours. This will make it much more cohesive. Try and keep each colour on a separate layer so it will be easier to make colour changes later on. As I mentioned before, this design changed quite significantly for me from the sketch to the final image, but that's ok! Your pattern will develop are your draw and you can always move things around to help them look balanced.

When you have finished illustrating your motifs, you are done! With this particular pattern you don't need to create the repeat in the usual way as nothing is actually touching the sides. It's ready as it is!
Optional extra: Add a texture!
I can't ever finish a pattern without trying out a few seamless texture overlays on the top to see if I can elevate it. Seamless texture overlays are a textured image you place over the top of a finished pattern. The overlays are already seamless so you don't need to worry about making them into a repeat
For this one I have added the 'grunge 2' overlay from my Seamless Texture Overlays pack separately onto both the background layers. It gives the background a very subtle mottled texture.

If you'd like to know more about seamless texture overlays and how you can use them in your own patterns, take a look at the pack below:

Variations on the novelty check
Once you have mastered this basic novelty check there are a couple of things you can do to mix things up a bit!
Firstly, you don't need to just stick to two colours for the checks, you could add a palette of a few different colours for the checks.
You could add patterns you have already made onto some of your check squares. This is what I have done with this adventure themed check. The best way to do this is to create some simple coordinating blender prints, then copy the whole canvas and paste it into your check pattern. With snapping and magnetics on, and the drawing guide on resize it to the correct size and place it where your check would be.

You could just fill the squares as usual but have one background colour. This gives a really structured repeat that is super easy to create but doesn't immediately look like a check. I have done this with this pattern below, and you can also see how easy it is to make some fun colour variations too!
If you want some more inspiration for your novelty check patterns, don't forget to check out this great Spoonflower design challenge 'Cheerful Checks' from July 2022.
Keep learning...
If you like this idea of creating several little illustrations to make up one pattern, I have a great template in my '20 Sketch Templates for Procreate: Pack 2' which gives you a template for a similar type of pattern but the blocks you design your motifs in are interlocking and varying sizes.
Again, with this type of pattern you can really go deep with a theme making it a great pattern for a collection of for SEO purposes.
You can check out this pack of templates by clicking the image below:

If you'd like to learn how to create more complex patterns in Procreate, you can take a look at my Procreate Patterns Class, which is suitable for all abilities, particularly those who are just starting out in surface pattern design or those moving to Procreate from a different software.

If you have any questions, comments, or need some clarification, don't hesitate to leave a comment below!


Comments